


Hawkgirl. Hawkgirl has been a massive cosplay goal of mine for a long time now. Curtis’ favorite character and we have been collecting every Hawkgirl statue we can find for years. So needless to say, I wanted to do this one well! However, because I am a professional procrastinator, i left it until the very last minute. I had a total of 2.5 weeks after DragonCon to make this costume after work before heading to Edmonton Expo. But I did it! And it wasn’t nearly as bad as i thought.
During the convention, everyone kept asking me “How long did that take you?!” expecting it to be a really long time… but the truth was, it only took me a few evenings and two long weekend days. And when you are gluing the feathers and binge watching american Horror Story, time flies! (bad pun is bad).
I tried my best to take extensive progress photos to show you, so hopefully this will help other people make their very of bird-lady!
Materials Used:
Wings
-2 tubes of 3/4 inch PVC Pipe
–(optional) PVC Cutting Tool
-1 roll of 14 gauge galvanized steel wire
-Sintra Thermoplastic (approx 1sq foot)
-Nylon Strapping
-2 meters lightweight, stretch fabric (same colour as your wings)
-4 meters medium weight fabric (for the fabric feathers)
-approx 750-1,000 real feathers (4-8in length)
–(optional) Airbrush to paint all feathers
Costume
-Yellow vinyl (heavy weight/medium weight)
-Red Vinyl (medium weight with stretch)
-Black Vinyl (for belt)
-Velcro
-Nylon Strapping
-Corset Boning
-2+ Snaps
-Worbla and Foam for Belt Emblem
-Red Ankle Booties (can paint black boots as I did)
-Green Dance Tights (or dye white tights green as I did)
-Bunny suit pattern (I used Yaya Han’s Pattern)
-Orange/Red Wig (I used the “Ferrari in Pumpkin from Arda Wigs)
-Hawkgirl Cowl (I purchased mine from the amazing Reevfx)
Mace
-Worbla
-Styrofoam Ball
-13 Styrofoam Spikes
-Craft Foam (Handle details)
-1 inch Tube of PVC Pipe (cut to length)
-Small amount of Brown vinyl to cover handle
-Gesso (priming)
-Modge Podge (Matte)
-Silver and Black Acrylic Paint
So the first thing I did when deciding on where to start, was obviously to choose WHICH Hawkgirl design i wanted to do. there are so many variations of her, and while they are all gorgeous, I settled on the old fashioned Cartoon style one. Because, seriously, its so darn cute!
I have also been really into making bunny suits these last couple months and i couldnt pass up the chance to make another one. But because this one is two separate colours, it added a slightly harder challenge for me this time around.
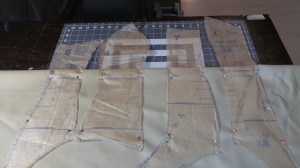
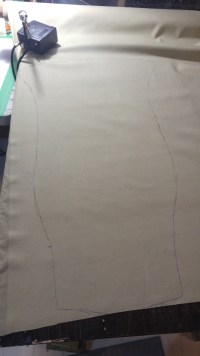
First thing first, you need to get your pattern, and you need to get your fabric. I luckily had both on hand, and since i was in such a rush, this worked in my favour greatly! Start by cutting out your pattern pieces (if you use Yaya’s pattern, you will need to choose which bust size to use) My measurements are below her smallest size, so I have to make the pattern and then cut out 1.5 inches on either side to get it to fit.
But each person will fit a little differently. Just follow the instructions on the pattern!
So once the patten was cut out, i laid out my red fabric, folded it over, and lined up the bottom half of each pattern piece on the fabric. After cutting those out, i snipped the fold at the top of each piece, adn then had all my bottom half sections ready!
|

|
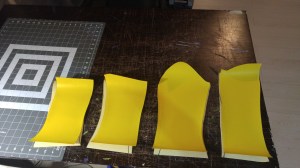
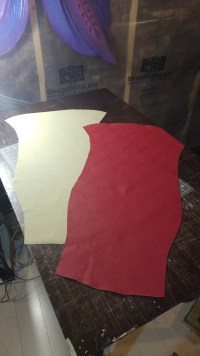
After that i repeated the same concept on the yellow fabric, with the top half of the pattern. Now it is quite difficult (at least for me) to get the pattern to line up at exacltly the waist of each piece, i made sure to leave a lot of extra pattern piece at the top/bottom of each section that i would trim later. Its always better to start with more, and trim it later, than to not have enough and need to add something in afterwards or even start again.

|
|
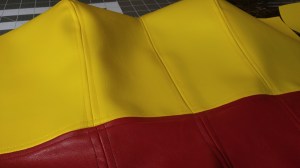
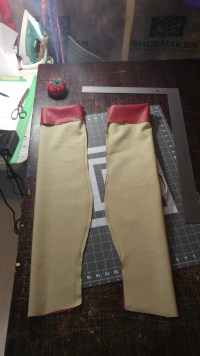
I then proceeded t sew all the pieces together, top half first, bottom half second. Then trimmed the waist area so they would have a nice flat seam connecting the two, and attached the top to the bottom. (dont forget to account for the seam allowance!). Basically you will need to follow all the steps twice, then connect the sections before sewing the zipper on and the front to the back.

|
|
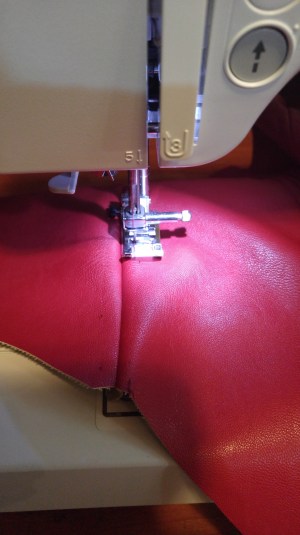
After everything is assembled and actually starting to look like an article of clothing, I really like to top-stitch all my leather/vinyl. It adds just the little touch of finishing to your project and strengthens the seams. I also at this point trimmed the top neckline area to get the more drastic V to the shape.
|

|
At this point, I would suggest doing up a lining for your outfit and adding in the boning in that, but since i was so crunched for time, i simply glued (baaaadd short cut) the boning to the inside of the bunny suit and didnt add a lining. It would be much more comfortable with ha lining.. But i just folded over the edges and sewed them down so it looked all finished, even though it wasnt. Haha.
NOW IT WAS TIME FOR THE WINGS!
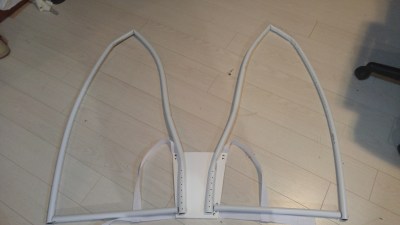
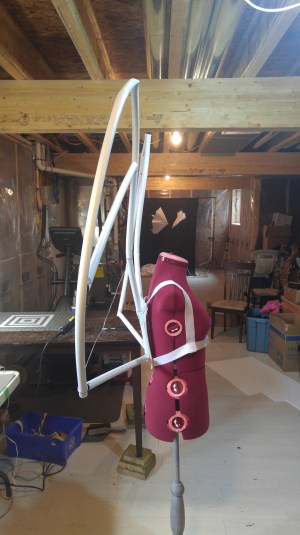
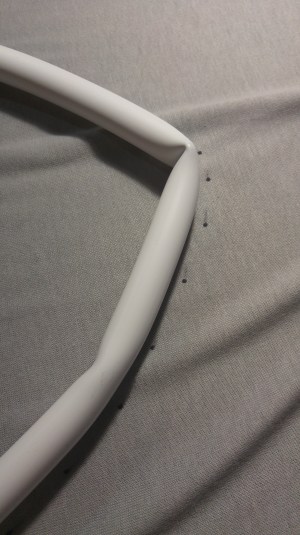
I started by using my heat gun to heat the PVC pipe and then slowly bend it into the shape i wanted (or at least as close to as possible) I used my legs to get it to make an “s” type curve and had many bruises as a result. Haha. But since i had no idea what i was doing, and really just experimenting, it worked all right.
After getting both sides to look pretty symmetrical, i made the back plate with the Sintra. All i did for this was measure to approx width I wanted it to be (slightly larger at the top by my shoulders). I cut that out on the Sintra, and used my heat gun to add the curves and shape of my back to the plastic.
I then flattened the end of the PVC pipe a bit, and drilled holes through both the pipe and the sintra plate. I threaded wire through the holes to make sure there was a good, strong attachment for each wing. I had drilled holes through the sintra in the corners, to attach the strapping in a “backpack” like fashion, but the studs i used to attach it, turned out not to be strong enough on the day of, and broke twice. I would suggest using some real nuts and bolts, or something else that is stronger to keep everything together.

|

|
If you havent used Sintra before, i suggest giving it a try! Its a thermoplastic like Worbla, but much stiffer, and it cant do all sorts of complex curves. It just sort of bends where you need it to. You can get it in different thicknesses and its pretty fun to play with. This was my first time actually using the stuff as well.
I used the piece of PVC that i had trimmed off the end of the wing shape, to make the cross bar on the bottom section of the wing panel. I attached that with some small drilled holes, and threading some wire through each piece to hold it together.
|

|
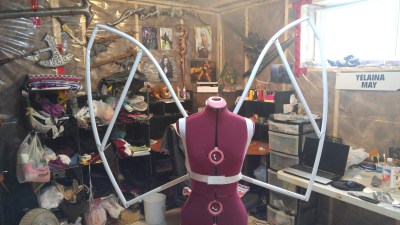
Now, because the wings werent holding as severe of an S curve as i would have liked, i used other pieces of PVC pipe and then some wire, to push out the outer curve, and pull in the inner curve. I am sure with enough time and skill you could make the PVC bend to your will, but i was impatient and out of time, so i used the above mentioned option. In the end it made the wings heavier, but also stronger.
PUSH OUT WITH PVC PIPE
|
|
PULL IN WITH WIRE
|
|
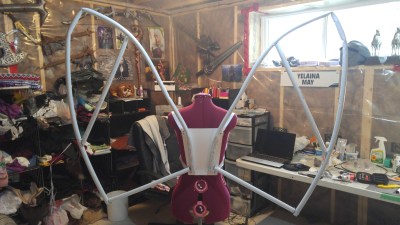
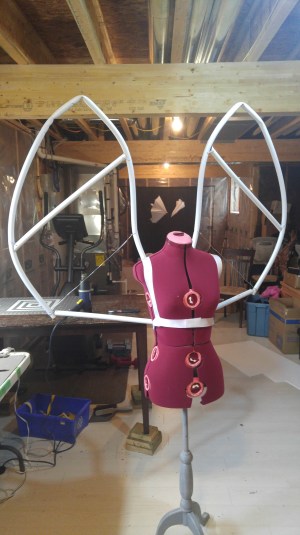
You will notice i also added an inwards curve to the shape of the wings from the side, so that they almost curled in around my shoulders.

|
After all that i added some more wire, just to make sure everything was strong, and nothing would be put under to much pressure and break. Lastly i covered it up wit ha smaller plate of Sintra to hide all the ugly-ness, but still make it accessible i needed to fix or change something later.
(You can also see how i used small holes and wire to attach to the PVC that in the inner curve. I used the same strategy whenever i was attaching other pieces of pipe and things like that)

|

|
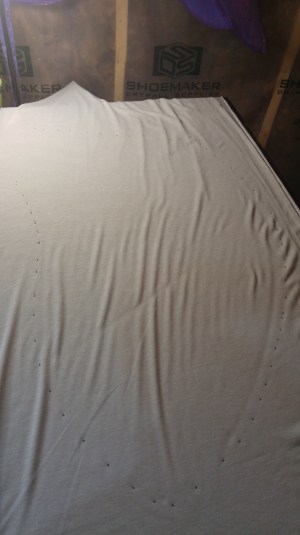
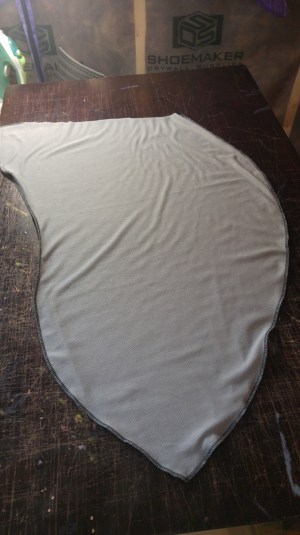
After that it was time to make the big “sock” to put over the wings. I used a really light knit fabric with some stretch that i found in the clearance section of the fabric store.
All i did was trace out the wing and cut out the rough shape. I used my serger to sew the pieces together (leaving the bottom edge open), but you can just use your normal sewing machine if you want. then turn it right side round so the seams are on the inside of the “sock” and slip it over the wings!

|
|
|
|
|
For the bottom edge that i used to slip the sock over the wing, i just used some hot glue to close it. You can also hand sew it, but i am super lazy and will do anything i can to not have to hand sew.. AND NOW YOU HAVE YOUR MOTH COSTUME! Haha.. but yes, it looks really odd right now.

|

|
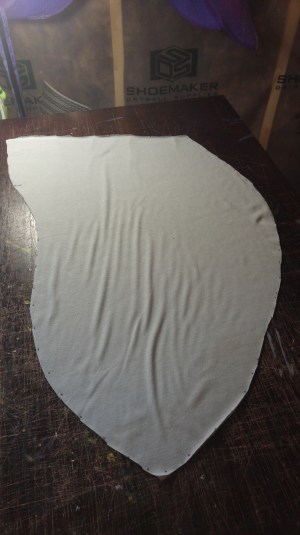
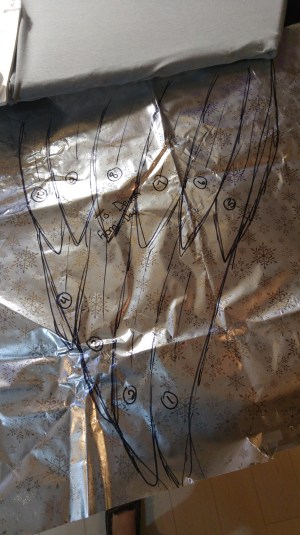
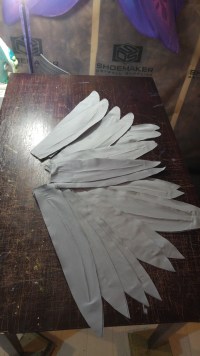
After that i traced out the basic pattern for the shapes of the fabric feathers i would need, and about how many. Just remember, more is always better. Also, i didnt have any large sheets of paper laying around… so i used some old wrapping paper. In the end i only used these as a very basic shape, and even for the shorter pieces i extended them quite a bit to make a full sized feather, but it helped me plan what i wanted to do, and what i wanted it to look like.

|
|
|
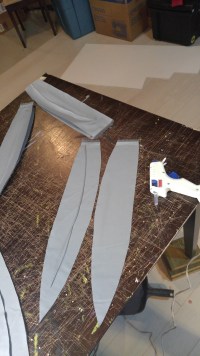
Next was tracing out as many feathers on the fabric as i could possibly fit. (remember that you need two identical pieces to glue the wire in between for each feather. I ended up using about 4 meters of fabric)
I then cut pieces of wire for each feather and used hot glue to glue the “spine” of the feathers in. After that i used some modge podge to glue the edges of the feathers closed so it was one solid piece.

|

|
|
|
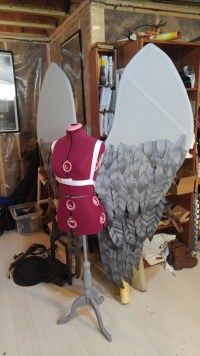
After painting the designs on the feathers (both sides of each feather) I glued them to the wing base. To paint the feathers i used my air brush that i bought on ebay for like $80 ages ago. If you can, i 100% suggest buying one, as i NEVER would have gotten this done without it. Its an amazing little tool. Make sure to watch some tutorials on how to properly mix the paint, clean it and to use the airbrush its self on youtube, before trying it out. Once you get the hang of it, your life will be so much easier!
I also added on the last row of feathers to make the wings have the proper shape from the cartoon.

|

|
|
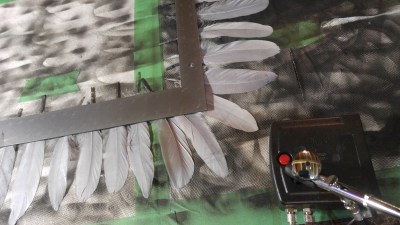
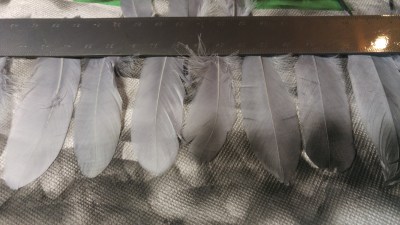
Next came airbrushing the real feathers. Now this is completely option ,and you can just use the regular colour of the feathers, but i wanted to add a little more dimension to them so i decided to give it a go! 1,000 feathers later (no exaggeration) I was regretting my decision a little, but it was worth it!
To make it faster, i used a heavy metal ruler i had, to lay on top of the end of the feathers, so i could airbrush 25 feathers at a time. It saved HOURS and made it really easy to just keep going.
|
|

|

|
Now it was time to glue.
I brought my wings upstairs, hung them on the back of a chair, turned on the TV, and binge watched American Horror Story while gluing the feathers. Really not much else to it. After getting the base later on both wing, front and back, i cut some feathers into smaller ones and added a “spine” to the back edge closest to my body for more realistic look. (not pictured)

|

|

|
Once the wings were feathered, i was so close to being done! Just the final things were left!
I actually did this before gluing the feathers, but i will still mention it now. I attached a layer of the same yellow vinyl i had used for my body, to the straps for the wings so that they wouldnt stand out like a sore thumb. I really wanted there to be no straps showing, but these wings were just to heavy to make that work. Also, so that i didnt have a strap across the front of my chest, i cut the strap that went there off, and attached it on the inside of my body suit. The end stuck out just enough that i could snap the wing strap onto the ends that were poking out the small slits in my body suit.
One of the last things i made were my boot covers, i traced out the pattern i have made (from a duct tape pattern made around my leg) onto the red vinyl. If you have 2-way-stretch fabric, make sure the stretch goes cross-wise not up and down. It will work 100 times better.
Once i cut out the pieces, i sewed them up the back seam, and folded over the top where i wanted them to end on my thigh. And ta-da! You have some fake tall boots to slip over your ankle booties! (always make sure to leave the bottom few inches of the cover open, so you can get it over your foot, and it lays nicely on the boots.
Also, for a little extra, i attach a small piece of elastic between the two bottom corners, that i loop under the heel of my boot to keep everything in place! I will do up a proper, in depth tutorial soon!
|
|
|
AND NOW THE MACE!
She has so many different maces, depending where you look, but i decided on the really tall one in the first statue we bought.
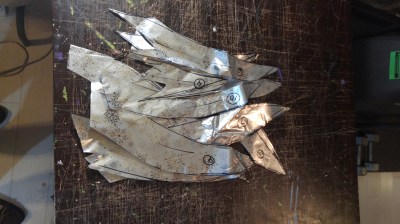
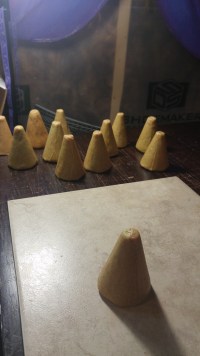
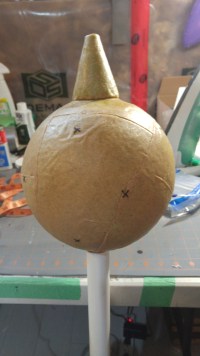
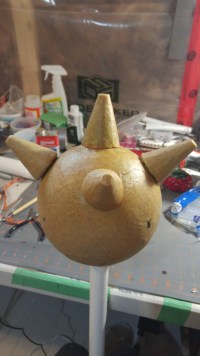
I started by getting a large Styrofoam ball from Michael’s, and 2 packs of the Styrofoam spikes. Unfortunately they come in packs of 6, and i need 13. I made a worbla mold basically of one, so that i could have that extra spike. So after covering the ball in worbla, and each spike in worbla, i started to attack them all together!
Tip: When covering Styrofoam in Worbla, i cover the whole foam thing in a layer of masking tape or painters tape. That way the foam doesnt melt when you are trying to heat the Worbla.
|
|
|

|
After getting everything attached, I layered some craft foam on the handle to get the details i wanted, then covered it in a layer of Worbla for durability. Then prime and paint forever! I am always super lazy when it comes to priming, but i suggest you do as muc has possible and sand it as smooth as you can. You can use Gesso or Modge Podge, or even Wood Glue and go to town.
After painting and weathering, i added a layer of modge podge over the top (matte) so that it wouldnt chip nearly as easily. Especially on the shaft of the mace, because PVC does not hold onto paint well. Then the last thing i added was the strip of vinyl i wrapped around the handle!
AND IT WAS DONE!!
once i get a photoshoot done i will add more photos to here!
